
Working with wrap panel in silverlight
The WrapPanel Control
The WrapPanel positions child elements in sequential position from left to right, breaking content to the next line at the edge of the containing box. Subsequent ordering happens sequentially from top to bottom or from right to left, depending on the value of the Orientation property.
It is very similar to the StackPanel control with one major difference: when items in a WrapPanel will not fit within the width or height of the control, they automatically wrap to a new row (if horizontal orientation) or column (if vertical orientation). This makes the WrapPanel ideal for laying out an unknown number of items as they will automatically wrap to take up the entire space of the control.
Demo:
In this example, we will explore the WrapPanel control and how it can be used to display an unknown
Number of items in stacks vertically and horizontally.
1. Open Visual Studio 2010 and create a new Silverlight application called
WrapPanel.
2. Inside the root Grid control of MainPage.xaml , place a WrapPanel with some rectangles inside it
<Toolkit:WrapPanel Orientation="Horizontal">
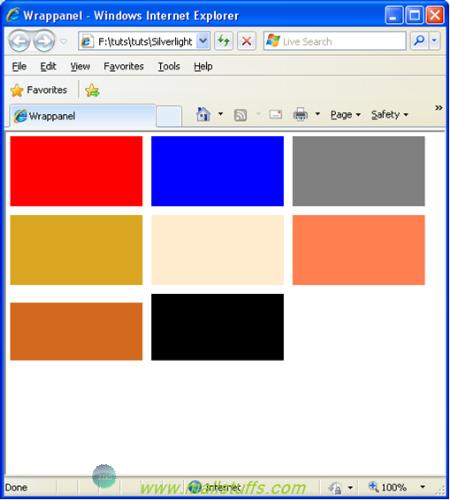
<Rectangle Height="100" Width="150" Fill="Red" Margin="5"/>
<Rectangle Height="100" Width="150" Fill="Blue" Margin="5"/>
<Rectangle Height="100" Width="150" Fill="gray" Margin="5"/>
<Rectangle Height="100" Width="150" Fill="Goldenrod" Margin="5"/>
<Rectangle Height="100" Width="150" Fill="BlanchedAlmond" Margin="5"/>
<Rectangle Height="100" Width="150" Fill="Coral" Margin="5"/>
<Rectangle Height="100" Width="150" Fill="Chocolate" Margin="5"/>
</Toolkit:WrapPanel>

As you see in the output above, a new row is created to show the fifth and sixth rectangle since the first four rectangles have consumed the entire width of the control/browser. I.e. horizontally, the Wrap Panel will place the items one after the other to the right, until no other items can fit within the width of the control. At that time, it will start to place the items in a new row directly below the first row. The same is true for vertical orientation except the items are stacked below the previous item until new items cannot fit within the height of the Control
Note: The WrapPanel is not part of the core Silverlight control set, but rather it is part of the Silverlight Toolkit. Because of this, you need to make certain you have the Toolkit downloaded and installed. In order to get the proper XML namespace added for the WrapPanel, add it by double-clicking on the control from the Toolbox in Visual Studio. That way Visual Studio will automatically add the Xml namespace to the page as shown below
xmlns:Toolkit="clr-namespace:System.Windows.Controls;assembly=System.Windows.Controls.Toolkit"
Except for adding controls to the WrapPanel, the WPF Designer does not provide additional design time help in case of wrap panel.
3. If you reduce or increase the width of the browser at runtime, you will further see that wrap panel rectangles are adjusted accordingly. As seen in the screenshot below, you will see that when I have reduced the width of the browser, one more row is created to show all the rectangles i.e. When the Wrap Panel is resized at runtime, it will automatically lay its child controls out again.
Hence, A real world example of using the WrapPanel would be the Windows Control Panel. With each icon and text being wrapped in its own panel, those panels would be added to the WrapPanel to provide flexible layout repositioning at runtime as the Control Panel is resized.
4. Similar to stackpanel, we can also add items to wrapapnel at runtime. Add a name to wrap panel as shown below.
<Toolkit:WrapPanel x:Name="wp" Orientation="Horizontal">
Code in the code behind file will be as follows:
Rectangle newRect = new Rectangle();
newRect.Width = 150;
newRect.Height = 100;
newRect.Margin = new Thickness(5);
newRect.Fill = new SolidColorBrush(Color.FromArgb(255, 0, 0, 0));
wp.Children.Add(newRect);
Also, we can have nested wrap panels (check the attached example)
 here
here
Note: Images used on this website
are either a production of Bhaktivedanta Book Trust(https://www.krishna.com), Iskcon
Foundation or were found in google search under "Free to use and share". If any
of the images presented here violates copyright issues or infringes anyone copyright
or are not under "Fair use", then please bring it to our notice. Read
Disclaimer for more.
Share this to your friends. One of your friend is
waiting for your share.
Related Articles
Give rounded corners to your panel using Ajax
Working with Stack Panel in silverlight
Simple Ajax client server Example
Ways of implementing AJAX
showing row details on button click of silver light datagrid
What is Silverlight,its features and how it works
Jquery features, Advantages and disadvantages
JQuery FAQ and Jquery Effects
Changing Grid View header and footer at run time
Binding Database columns with apostrophe
Post Comment