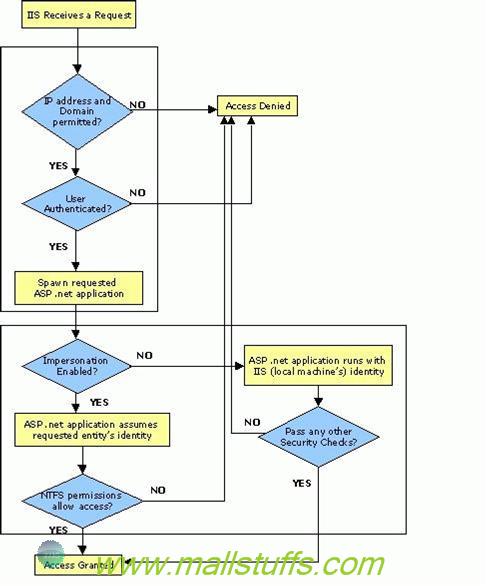
Overview
You should choose Windows authentication if your web application is to be used within the network or in the scenarios where user accounts are maintained by a Windows domain controller or within Microsoft Windows Active Directory with no firewall restrictions.
Windows authentication can be coupled with IIS authentication where IIS authenticates your application's users by using Basic authentication/ Integrated Windows authentication/ Digest authentication, or Client Certificate authentication. Both Integrated Windows authentication and Client Certificate authentication provide strong authentication, but Integrated Windows authentication is recommended unless you have a PKI infrastructure and your clients have certificates.
To use windows authentication, we need to know about a concept called impersonation.
What is impersonation?
Impersonation is the process of using the user account to perform resource access related operations. By default, the anonymous access account used is IUSER_machinename. This account can be used to control anonymous users' access to resources on the server. When the server is impersonating the client, any operations performed by the server are performed using the client's credentials.
Why impersonation?
By default, ASP.NET executes in windows account. Sometimes you need to access data from network resources such as a file on a shared drive, which requires client credentials. So, the only way to access these resources is that asp.net must use the logged-in client credentials. This is done by using impersonation. With impersonation, ASP.NET executes the request using the identity of the client who is making the request.
Impersonation Options
Windows authentication with ASP.NET can be used in a number of ways:
Windows authentication without impersonation.
By default, ASP.NET applications are not configured for impersonation. You can confirm this by seeing the identity settings in the Machine.config.comments file located in the following folder:
%windir%\Microsoft.Net\Framework\{Version}\CONFIG.
The <identity> element is configured as follows. Note that the impersonation is disabled.
<identity impersonate="false" userName="" password="" />
In this case, ASP.NET performs operations and accesses resources by using your application's process identity, which by default is the Network Service account on Windows Server 2003/XP. For the resource access attempt to succeed, the ACL attached to these resources must be suitably configured to allow the process account or the access it requests, such as read access, or write access.
Windows authentication with impersonation.
With this approach, you impersonate the authenticated user and use that identity to perform operations and access resources.
To configure ASP.NET to use Windows authentication with impersonation, add the following line in web.config inside <system.web> element.
<identity impersonate="true"/>
When you configure your application for impersonation, an impersonation token for the authenticated user is attached to every Web request thread. As a result, all local resource access is performed using the caller's identity. i.e. Resources such as files, databases, registry keys, and Active Directory objects are accessed by using the impersonated identity.
Now, one problem here is that if you try to access your Web site from a different machine in the same domain and the Web site attempts to access network resources then you will end up with a null session on the remote server and the resource access will fail. This is because the resulting impersonation token and associated logon session does not have network credentials.
This issue is addressed by impersonating ASP.NET with a fixed identity. I.e. you specify the credentials of the impersonated identity in Web.config file as shown here.
<identity impersonate="true" userName="domain\userName" password="password"/>
Now if you want to protect your username and password stored in your web.config from hackers, illegitimate users etc., then you can do it by storing username and password in an encrypted format by using the Aspnet_regiis.exe tool. However note that encrypting or specifying credentials on the <identity> element is not recommended and should be avoided wherever possible. Instead, use a custom application pool with a custom service account identity which will avoids impersonation.
Windows authentication with fixed-identity impersonation.
If you only require an impersonated identity to access specific resources or perform specific operations and can use your process identity the rest of the time, you can use programmatic impersonation to temporarily enable impersonation.
Temporarily impersonate the authenticated user
1. Set impersonation to false on the <identity> element in the Web.config file.
<identity impersonate="false" />
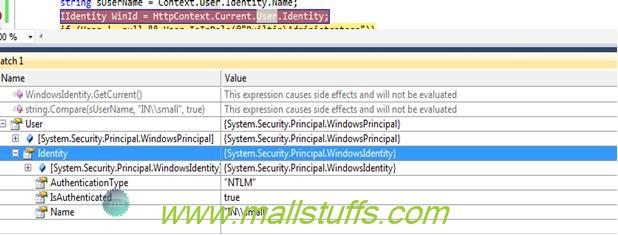
2. Obtain the authenticated user's Windows token.
IIdentity WinId = HttpContext.Current.User.Identity;
WindowsIdentity wi = (WindowsIdentity)WinId;
3. Use the authenticated user's Windows token to temporarily impersonate the original user and remove the impersonation token from the current thread when you are finished impersonating.
WindowsImpersonationContext wic = wi.Impersonate();
try
{
// Access resources while impersonating.
}
catch
{
// Catch exceptions.
}
finally
{
// Revert impersonation.
wic.Undo();
}
At any moment of time if you want to know who the user is and what kind of authentication type he is using, you can use the identity object. If you want to know what kind of roles it’s associated with then we need to use the principal object.
Configuring Windows Authentication
To configure your application to use Integrated Windows authentication, you must use IIS Manager to configure your application's virtual directory security settings and you must configure the <authentication> element in the Web.config file.
To configure Windows authentication
1. Start Internet Information Services (IIS).
2. Right-click your application's virtual directory and then click Properties.
3. Click the Directory Security tab.
4. Under Anonymous access and authentication control, click Edit.
5. Make sure the Anonymous access check box is not selected and that Integrated Windows authentication is the only selected check box.
In your application's Web.config file or in the machine-level Web.config file, ensure that the authentication mode is set to Windows as shown here.
<system.web>
<authentication mode="Windows"/>
</system.web>
When you configure your ASP.NET application as windows authentication it will use local windows user and groups to do authentication and authorization for your ASP.NET pages. Below is a simple example where I have set windows authentication in my web.config file
Benefit of Windows Authentication
The main benefit of using Windows authentication is that it can be coupled with IIS authentication so that you don't have to write any custom code. Compared to other authentication mechanisms, Windows authentication does not pass the user credentials over the wire. Windows authentication also provides a seamless user experience. Therefore Windows authentication should be used wherever possible.
So, the whole concept of windows authentication can be summarized as:
Authorization
Authorization means checking if the user has access to a particular resource on the IIS website. A resource can be an ASP.NET web page, media files (MP4, GIF, JPEG etc.), compressed file (ZIP, RAR) etc.
So the first process which happens is authentication and then authorization. After authentication,
when the user starts accessing resources like pages, ASPDOTNETauthentication, videos etc, he is checked whether he has the necessary access for the resources. The process of identifying the rights for resources is termed as ‘Authorization’.
Authorization Options
Regardless of impersonation method you use, you can authorize users and control access to resources and business operations by using the following techniques:
URL authorization: You use URL authorization to control access to requested files /folders of your website. You configure URL authorization by using an <authorization> element in the Web.config file to control which users or groups of users should have access to requested resources. Authorization is based on the IPrincipal object stored in HttpContext.User. With Windows authentication, this object is of type WindowsPrincipal and it contains a WindowsIdentity object that holds the Windows token for the authenticated user.
Note ASP.NET version 2.0 on Windows Server 2003 protects all files in a particular directory, even those not mapped to ASP.NET such as .html, .gif, and .jpg files.
To configure URL authorization, add an <authorization> element to the Web.config file, and specify the domain name followed by user or group name when configuring <deny> and <allow> elements, as shown here.
<authorization>
<allow roles="BUILTIN\Administrators, BUILTIN\Users"/>
<deny users="*"/>
</authorization>
As seen above,roles take the form domainName\GroupName. Similarly, user names take the form domainName\userName. Well-known local groups such as Administrators and Users are referenced by using the "BUILTIN" prefix as shown above. You can add more than groups or userseperating each of them by comma
<authorization>
<allow roles="BUILTIN\Administrators"/>
<deny users=" BUILTIN\Guests"/>
</authorization>
File/Folder authorization. We can also have a file/Folder level authorization. This authorization is applied only for file types mapped by IIS to the ASP.NET ISAPI extension (Aspnet_isapi.dll). Automatic access checks are performed using the authenticated user's Windows access token against the access control list (ACL) attached to the requested ASP.NET file.
Ex. If
<location path="User\Default.aspx">
<system.web>
<authorization>
<allow roles="BUILTIN\Users"/>
<deny users="*"/>
</authorization>
</system.web>
</location>
This FileAuthorizationModule class only performs access checks against the requested file. For example, if you request Default.aspx and it contains an embedded user control (Usercontrol.ascx), which in turn includes an image tag (pointing to Image.gif), the FileAuthorizationModule performs an access check for Default.aspx and Usercontrol.ascx, because these file types are mapped by IIS to the ASP.NET ISAPI extension. The FileAuthorizationModule does not perform a check for Image.gif, because this is a static file handled internally by IIS.
Role checks
You can check the authenticated user's role membership by using methods such as User.IsInRole or Roles.IsUserInRole. To use the Roles API, you need to enable role manager for your application. You can also have class level or method level security by using principal permission methods to control which users should be allowed to call classes and methods.
To use explicit role checks:
Use the IPrincipal interface of the User object attached to the current HTTP request. With Windows authentication, make sure to use the domainName\userName format for the user name and the format domainName\groupName for the group name.
if (User != null && User.IsInRole(@"Builtin\Users"))
{
Response.Redirect("User/Default.aspx");
}
Alternatively, we can also use role manager APIs introduced in ASP.NET version 2.0, which supports a similar Roles.IsUserInRole method, as shown here.
If(Roles.IsUserInRole(@"Builtin\Administrators"))
// Perform restricted operation
else
// Return unauthorized access error.
To use the role manager API, you must enable role manager. With Windows authentication, you can use the built-in AspNetWindowsTokenRoleProvider, which uses Windows groups as roles. To enable role manager and select this provider, add the following configuration to your Web.config file.
<roleManager enabled="true" defaultProvider="AspNetWindowsTokenRoleProvider"/>
When you use Windows authentication, you can use alternate role providers, such as the AuthorizationStoreRoleProvider and SqlRoleProvider, if you need to store roles in alternate role stores such as Authorization Manager Policy stores or SQL Server databases.
To use PrincipalPermission demands Construct a PrincipalPermission object, and then call its Demand method to perform authorization.
using System.Security.Permissions;
PrincipalPermission pp = new PrincipalPermission(@"Builtin\Administrators ", null);
pp.Demand();
Alternatively, you can decorate your classes or methods with the PrincipalPermissionAttribute, as shown here.
using System.Security.Permissions;
[PrincipalPermission(SecurityAction.Demand, Role = @"Builtin\Guests")]
public static void DeleteDatabase()
The advantage of this approach is that the security requirements of your methods are visible to tools such as Permview.exe.
Let us now see an example of windows authentication and authorization as shown below:
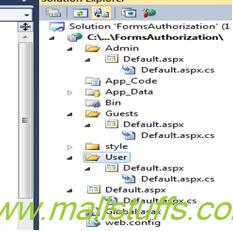
Step 1:- Creation of web site.First step is to create a simple web site with 3 folders with an aspx page in each of them (Admin, User and Guest) as shown below.
Step 2:- Configure the ‘web.config’ file
In ‘web.config’ file set the authentication mode to ‘Windows’ as shown below.
<authentication mode="Windows"/>
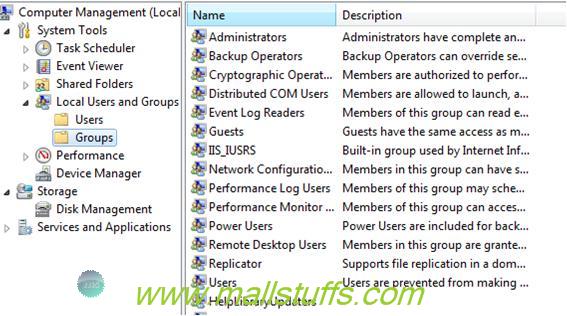
Step 3:- Check user and roles in the windows directory
Goto My computer-> manage-> local users and groups to check out the various roles and users
Step 4:- Setup authorization as per the roles and users you see in step 3
<location path="Admin">
<system.web>
<authorization>
<allow roles="BUILTIN\Administrators"/>
<deny users="*"/>
</authorization>
</system.web>
</location>
<location path="User/Default.aspx">
<system.web>
<authorization>
<allow roles="BUILTIN\Users"/>
<deny users="*"/>
</authorization>
</system.web>
</location>
<location path="Guests">
<system.web>
<authorization>
<allow roles="BUILTIN\Guests"/>
<deny users="*"/>
</authorization>
</system.web>
</location>
<location path="Default.aspx">
<system.web>
<authorization>
<allow users="*"/>
</authorization>
</system.web>
</location>
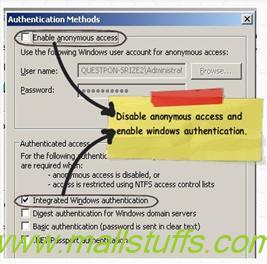
Step 5:-Configure Your Project setting in IIS the next step is to compile the project and upload the same on an IIS virtual directory. On the IIS virtual directory we need to ensure to remove anonymous access and check the integrated windows authentication as shown in the below figure.
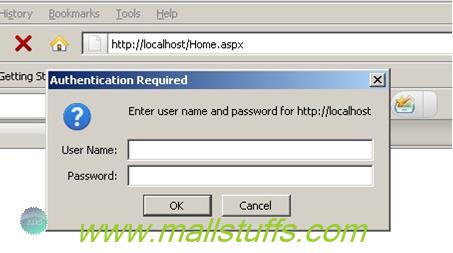
Now if you run the web application you will be popped with a userid and password box as shown below.
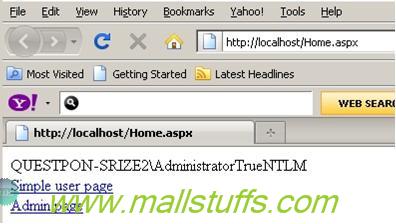
Once you enter credentials you should be able to see home.aspx as shown below.
In case you are not an administrator (i.e in this case its ‘shiv’) and you navigate to ‘Admin.aspx’ it will throw an error as shown in the below figure.

In case you want to read who the user is and with what authorization rights has he logged in you can use ‘WindowsPrincipal’ and ‘WindowsIdentity’. These two objects represent users who have been authenticated with Windows authentication. You can also get the roles these users have.
Reference
https://msdn.microsoft.com/en-us/library/ff647076.aspx
 here
here
Note: Images used on this website
are either a production of Bhaktivedanta Book Trust(https://www.krishna.com), Iskcon
Foundation or were found in google search under "Free to use and share". If any
of the images presented here violates copyright issues or infringes anyone copyright
or are not under "Fair use", then please bring it to our notice. Read
Disclaimer for more.
Share this to your friends. One of your friend is
waiting for your share.